

Design of V.C.O.'S
|
|
|
|
Design of V.C.O.'S |
|
What exactly is a voltage controlled oscillator or as more commonly known a vco?, what is its purpose in life?
Here I'm going to use a very practical example where one of my readers has a requirement for a voltage controlled oscillator operating at 1.8 - 2.0 Mhz (amateur radio band 160M). This is to be part of a frequency synthesizer, although a vco isn't always associated with a frequency synthesizer.
The very high costs and difficulties encountered when buying quality variable capacitors today often make vco's an extremely attractive alternative. As an alternative all you need is an extremely stable BUT very clean source of dc power, a varactor diode and a high quality potentiometer - usually a 10 turn type. Please note that circuit Q tends to be somewhat degraded by using varactor diodes instead of variable capacitors.
For people who are confused at this point allow me to explain. Diodes when they have a reverse voltage applied exhibit the characteristics of a capacitor. Altering the voltage alters the capacitance. Common diodes such as 1N914 and 1N4004 can be used but more commonly we use varactor diodes specifically manufactured for vco use e.g. Motorola's MVAM115, Philips BB112 and BB212. They are also sometimes called tuner diodes.
The design requirements asked for were:-
(a) frequency coverage 1.8 - 2.0 Mhz
(b) voltage controlled by a frequency synthesiser with an output level sufficient to drive the input of a Phase Locked Loop (PLL)
(c) a further buffered output for a digital frequency readout.
(d) another buffered out put to drive succeeding amplifier stages.
Because in this example the ultimate frequency stability is determined by the reference crystal in the frequency synthesiser there can be some relaxation of stability standards. The buffered outputs will be covered under buffer amplifiers.
Let's look again at our previous oscillator circuit. If you are unfamiliar with oscillators then review my previous oscillator tutorial. It will certainly help you.
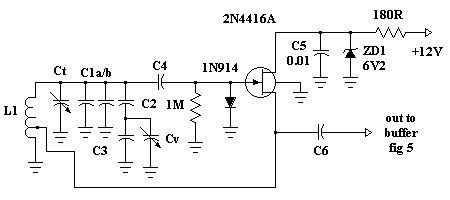
Fig 1.
Here Cv the variable capacitor, could be replaced by a suitable varactor diode as a tuning diode and in actual fact our reader has on hand a Motorola MVAM115 varactor. This I think is nearly similar to my Philips BB112 diode. So we will rehash the above figure 1 to accomodate varactor diode tuning instead of using a conventional variable capacitor.
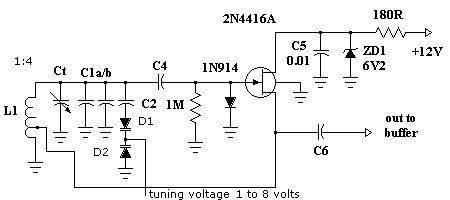
Fig 2.
Now I've left Ct and C1 a/b all in the circuit. In this application of a frequency synthesiser they are unlikely to be necessary. To tune from 1.8 to 2.0 Mhz which is a frequency swing of 2 / 1.8 = 1.111 - which when squared means we need a capacitance ratio of 1.234 to 1
That means the ratio of minimum combined capacitance in the circuit to maximum combined capacitance in the circuit must change by 1.234 to 1.
Looking back at the tutorial on oscillators I said the inductor should have a reactance of about 180 ohms. So around the frequency of interest I expect an inductor of about 15 uH to be used for L1 in Fig 2.
You should be used to calculating LC numbers by now but L X C at 1.8 Mhz = 7818 and at 2 Mhz it works out about 6332. Dividing both by our 15 uH inductor we get a Cmin of 422 pF and Cmax of 520 pf. Which incidentally if you check 520 / 422 = 1.232:1 So the variation of C is 520 - 422 = 98pF swing.
For synthesisers or any voltage tuning you should have the largest voltage swing possible. This minimises the effects of noise voltage on the tuning voltage. My BB112 diode can be operated ideally from 1V to 8V. That means we can tune the 200 Khz (2.0 - 1.8) with a variation of 8 - 1 = 7 volts. It follows 7v / 200 Khz = 35 uV/Hz. If our noise level is below this then the tuning can't be varied or fm'ed by noise.
At 8V my diode exhibits a capacitance of around 28 pF while at 1V the capacitance is about 500 pF. If Mr. Philips answered my emails I could possibly reproduce here for you the capacitance versus voltage graph which would be helpful. Hullo anybody with authority from Philips or Motorola reading this - hint, hint. Help always welcome.
You will note I have two diodes back-to-back in series in Fig 2. Although this in effect divides total varactor diode capacitance by two it eliminates the nasty effect of the rf present in the tank circuit driving a single diode into conduction on peaks which will increase the bias voltage, this also gives rise to harmonics.
It follows that my varactor diode capacitance now swings a net approximate 14 pF up to 250 pF when the bias voltage is varied from 8 volts down to 1 volt. You can of course go below 1V for higher capacitance but I tend to be conservative and generally do not go below 1V very much.
Now we have a net swing of 250 - 14 or 236 pF. You will recall above I said "the variation of C is 520 - 422 = 98pF swing" so how do I reduce a 236 pF swing down to a 98 pF swing? Look at capacitor C2 which is in series with both varactor diodes, does this not reduce the net capacitance?
This is a simple
mathematical problem (Oh God - not again
Bearing in mind with a vco and the voltage swings involved, you can get a fair bit of leeway and that each varactor diode varies greatly from predicted data of capacitance versus voltage. That means a lot of this is guesswork or suck-and-see. Technically it means it's all determined "empirically". All of that just says we will use a 180 pF capacitor for C2.
Using a 180 pF capacitor for C2 and putting it in series with D1 and D2 we get at 1 volt D1 = 500 pF, D2 = 500 pF and C2 = 180 pF. Net result = 1 / [(1 / 500) + (1 / 500) + (1 / 180)] which is about 105 pf.
Similarly at 8 volts we get D1 = 28 pF, D2 = 28 pF and C2 = 180 pF. Net result = 1 /[(1 / 28) + (1 / 28) + (1 / 180)] which is about 13 pf.
It follows the swing now becomes 13 pf to 105 pF or a net 92 pF which is near enough for this exercise. I had said very much earlier "by using our 15 uH inductor we get a Cmin of 422 pF and Cmax of 520 pf. Which incidentally if you check 520 / 422 = 1.232:1 So the variation of C is 520 - 422 = 98pF swing". How do we get near this requirement?
If we need Cmax of 520 pF and our series connection gives us 105 pF we need an extra 520 - 105 = 415 pF. On the other hand Cmin required is 422 pF and the series connection provides 13 pf we need 422 - 13 = 409 pF. It can be seen if we allow a trimmer of say 25 pF for Ct, which is the suggested trimmer in figure 2 - (that is Ct can varied from say 5 to 25 pF) - and we allow the combination C1 a/b to be a total of around 390 pF we have obviously achieved our goal. Is this not cool?
For our inductor L1 I would use a toroid although if you have access to a variable inductor you could use it. An air cored inductor most likely would be too large to consider. Suitable toroids of the Amidon / Micrometals type would at 2 Mhz be the T50-2 type which would require about 55 turns of #26 wire or even the T68-2 type requiring about 51 turns of #24 wire. Both gauges mentioned are those which will conveniently fit around the core.
No matter your frequency range of interest the basic principles outlined above will more or less still apply.
For a frequency synthesiser the tuning voltage is derived from the low pass filter of the PLL and you don't need to worry about it. On the other hand when you have an application of replacing a variable capacitor and manually tuning with say a ten turn potentiometer you need to be very careful about the "quality" of the voltage. It MUST be clean!
Below in Figure 3 is a suggested schematic for deriving suitable tuning voltages.
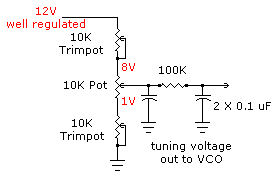
Fig 3.
The 10K pot is your 5 or 10 turn "quality" potentiometer for tuning, the upper and lower trim pots (set and forget) allow you to adjust the voltage range of your choice that your tuning potentiometer will see. Again use "quality" trimpots. The 100K resistor and the two 0.1 uF capacitors are further filtering. Obviously there is considerable interaction between the trimpots and potentiometer so expect a lot of juggling back and forth.
If you wished, in some applications, both trimpots could be replaced by fixed resistors. It is simply a matter of using ohms law.
Collin's Home Page Colin's Amateur Radio Page Colin's Snooker Page Colin's Guest Book Contact Me About Me
This Web page was last updated on Friday September 21, 2001
© 2001 Designed by Colin McCord